Posts

Calling Python from Substance Painter

Here is a quick code snippet for calling a Python script from Substance Painter and parsing the results. The in/out is very simple, but serves as an example of using the alg.subprocess.check_output function to bridge the JS api and your own Python scripts. // This can be called from the QML UI, or elsewhere in the plugin code. function GetAllFilesInDirectory(root) { if (root == undefined) return; // I put my scripts in a relative path to keep my plugin tidy. var script_path = "Scripts/FileUtils.py"; // Gathering files var ret = "NOSTRING"; try { // The arguments are used as parameter inputs to the Python script. This requires some planning // and well communicated conventions, but works well enough. ret = alg.subprocess.check_output( [ pypath, // Absolute path to interpreter. script_path, // Relative path to the py script. "log_files_of_type", // sys.argv[1], in this case the python ...
Making A Hello World Substance Painter Plugin

Image
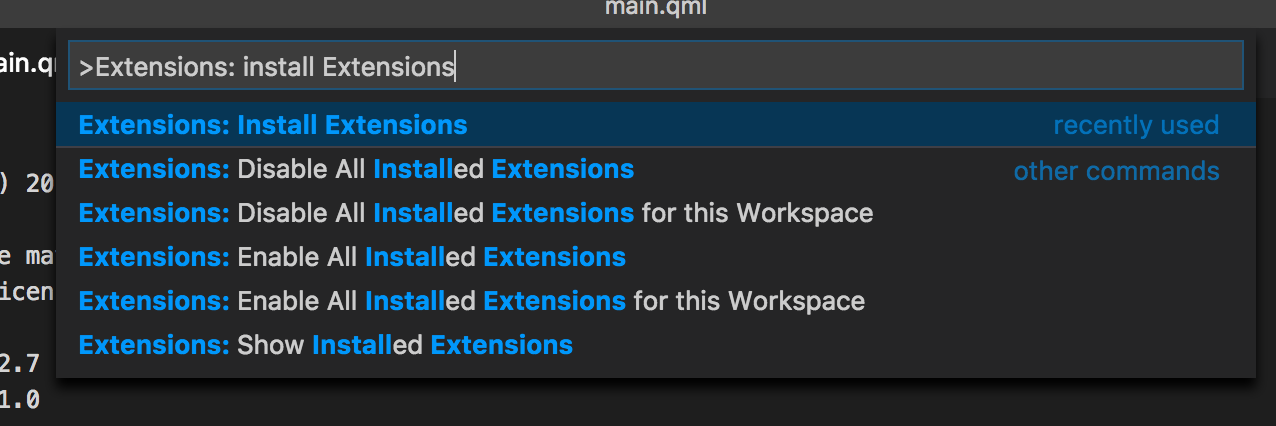
Substance Painter plugins use the QT Meta Language , or QML files to build their interface. From Wikipedia: It is a JSON-like declarative language for designing user interface–centric applications. Inline JavaScript code handles imperative aspects. It is part of Qt Quick, the UI creation kit developed by Nokia within the Qt framework. Using this information, we can start building a window with a button to execute our script. Visual Studio Code For this tutorial I’m going to be using Visual Studio Code , a lightweight IDE from Microsoft. It’s not the same thing as Visual Studio, but it’s a nice scripting editor that’s available on Mac, Linux and PC. Other text editors like Sublime will do the job quite well. Installing QML Syntax Highlighting By default, QML files will appear as ordinary text files in Visual Studio Code. While this won’t stop you from being able to write the plugin, adding some QML support will make reading, organizing and editing our script easier.  To do this, I’...

Egad

One line Unreal Engine 4 (mac os) Review: Doing Ue4 development on a Mac is not a great experience. Update: https://issues.unrealengine.com/issue/UE-23624 Just ran into this one... cleaning your project in XCode nukes the actual editor . Case in point.

RenderDoc

Image
Probably familiar to any TA or Engineer who deals with their graphics pipeline, RenderDoc is a tool I have found incredibly useful for debugging graphics in Unreal. Formerly a Crytek internal graphics debugging tool, it was released to the public in 2014. The tool is developed by Baldur Karlsson, and it boggles my mind that a tool this gosh-darn useful has been given to the public for free. Kudos to Baldur and to Crytek. Previously I was using NVIDIA Nsight to view and debug runtime atlased textures, and it was quite slow and somewhat unintuitive to sift through the outputs to find what I was after. RenderDoc on the other hand is not only fairly straight forward to get running, the turn around time to get meaningful output for frame-debugging is extremely rapid. For Ue4 integration I'm using Temaran's RenderDoc Ue4 plugin , which makes frame captures in game as simple as entering a command on the command line-  RenderDoc.CaptureFrame Check it out if you need to know more abou...

Substance Designer foray

Image
I'm pretty late to the whole substance craze, having spent three years in a mobile development environment where textures larger than 512x512 caused eyebrows to raise within the engineering team. But I kept hearing things about it being amazing, so I thought I'd give it a shot. Here is my attempt at a "hand painted" look, based off of similar processes I'd use in Photoshop. The texture is generated using an exported sbsar material and... well, thats it. I saw a nice example online of using a switch to swap out gradient maps in a material which allowed me to create a bunch of looks in the one material. This tool makes me happy.

A Quick Checkin- Clion, Unreal and Mac

Image
Super quick check-in. Hello world! For the last year or so, I've been working with Echtra Inc. on a great project as a Tools Engineer/Technical Artist guy. The project is using the Unreal Engine, which I like more and more every day. On Windows, C++ plus Visual Studio Pro and Visual Assist is a great combo, and I happily churn through my daily tasks without fighting the tools too much. Not so on my Mac at home. Programming in Unity on a Mac is great! Mono Develop isn't amazing, but it isn't terrible. But Unreal on a Mac. I want it to be fun, I want it to be possible, but I just can't get myself to like, let alone enjoy, XCode. On that, for anyone thinking "well, you could just use blueprints..." etc, I feel it's too much of a shackle to not be able to just dive into the guts of it. C++ or bust. So anyway, I recently adopted PyCharm at work and really enjoyed using it for my Python tools. I noticed that JetBrains also made an IDE called CLion , and they ...

Substance Painter Tutorialをやってみる⑰

Image
Substance Painter Tutorial – Fundamentals 17: Exporting textures 要点まとめ テクスチャの出力 ここまでで作成したテクスチャを仕様にあわせて出力します。 UE4やUnity5向けのプリセットやまた、自身でカスタマイズしたエクスポート形式などが組み立てられます。 使い方 ショートカット:Ctrl+Shift+E…エクスポートウィンドウが起動

Substance Painter Tutorialをやってみる⑯

Image
Substance Painter Tutorial – Fundamentals 16: Emissive effects 要点まとめ エミッシブの追加 いずれかの部分に対して、光らせたい箇所(自己発光体)があった場合、 エミッシブマップと呼ばれるチャンネルを追加することがあります。 前述の半透明の取り扱いと同様に、 TextureSet Setting より"放射性"のマップを追加します。 また、発光物をより発光させて見せたい場合は、 ビューアー設定の"EmissiveIntensity"や ポストエフェクト"グレア"等の値を調整を行い、マップの作成を詰めましょう。

Substance Painter Tutorialをやってみる⑮

Image
Substance Painter Tutorial – Fundamentals 15: Opacity 要点まとめ 半透明モデルの取り扱いについて 半透明を取り扱う場合は、シェーダー種の変更とテクスチャセットの追加が必要となります。 TextureSetSettings  チャンネル→ 不透明度 を追加 ViewerSettings  Shader: pbr-metal-rough-with-alpha-blending を選択 これでアルファの設定もできますね! また、パンチスルー(二値抜き)の場合は、Shader設定をwith-alpha-testに変えましょう。

Substance Painter Tutorialをやってみる⑭

Image
Substance Painter Tutorial – Fundamentals 14: Smart Materials 要点まとめ スマートマテリアル これまでに解説のあったマテリアルや、 Generator/filter等のスタックを使用して作った素材構成をプリセットしたもの。 (塗装された鉄などであれば、塗装のレイヤーグループ/ベースの鉄などの階層化されたもの) これによって、同じ素材のテクスチャ製作は楽に作れる!といったものです。 便利ですね。 また、自身で組み立てた、レイヤー構造もグループレイヤーにすることで、 スマートマテリアルとして利用可能となります。 (SP1.5以上だと、自動的にスマートマテリアルのサムネイルが出来るそうです。)

Substance Painter Tutorialをやってみる⑬

Image
Substance Painter Tutorial – Fundamentals 13: Projection tool, stamping images 要点まとめ プロジェクションマスク スクリーンスペースに対して、マスクをかけれます!って機能ですね。 使い方 下図の上のほうにあるボタンを押すか、 キーボードショートカットで、3で使用出来ます。 プロジェクションマスク機能としては、マテリアル/各マップ単位で有効に出来るようです。 動画では、一括して編集するにあたり既存のマテリアルをさしてマスクとして使用されていました。 下図は、実際にプロジェクションマスクを使用してみたものです。 なるだけ、手調整はなしにしたいですが、便利そうですね。

Substance Painter Tutorialをやってみる⑫

Image
Substance Painter Tutorial – Fundamentals 12: Generators and Filters 要点まとめ Generator 字のごとく、生成機能! 下図のようなカドが削れて、錆びが出てきた!見たいな処理や 空間座標を元に、下のほうだけ汚れている!などの処理を生成してくれる機能です。 使い方 実行対象のレイヤーの上で右クリック→Add Generatorを選択 レイヤーの下に、新たにスタックが追加されるので、 プロパティウィンドウより、必要なGenerator項目を選択して使用します。 ※利用する際は、BakeTextureで生成されたマップが必要なので、注意しましょう。 ※スタックは複数保持可能で、順番も入れ替え可。 また、スタックにはAdd Paintと呼ばれる加筆用のスタックもあるので、 AdditionalMapに依存しないユニークな調整も可能になります。 Filter フィルタはPhotoshop等でよく利用するあいつです。 カラーマップ/グレースケールマップのいずれかに使える内容が変わりますが、 Photoshopのフィルタが理解できていれば、普通に使えてるハズ。 Level またスタックには、レベル補正の機能となる"Level"もあります。 下図の例の場合だと、新規にラフネスにだけ影響するレイヤーを作成し、 レベルのスタックを追加して調整するといった内容を行っています。(右図)

Substance Painter Tutorialをやってみる⑪

Image
Substance Painter Tutorial – Fundamentals 11: Masking 要点まとめ レイヤーへのマスクの追加方法 レイヤを作って右クリックでメニュがー出てくる。 Add Black Mask…黒いマスクで作成(無効) Add White Mask…白いマスクで作成(有効) Add Bitmap Mask…いずれかのマップをマスクとして利用(カーバチャーとか) Add mask with color selection…色指定でマスクを作成(ポジションマップとか、IDを利用) ビューポート上に、マスク状態を表示させる ViewerSettingsから、表示選択が可能 モード:Solo ビュー:マスク マスクのコピー&ペースト Ctrl + Shift + Cでマスクをコピー Ctrl + Shift + Vでマスクをペースト マスクを消す 右クリック→Clear maskで消える ※レイヤの下にあるスタック系も消えるの注意! 塗りつぶし レイヤーごと塗りつぶす場合 レイヤーのマスクを選択した状態で、"Add fill"を追加 ポリゴン単位で塗りつぶす場合 Polygon Fillのツールがあるのでそちらを利用。 三角ポリゴン / 四角ポリゴン / メッシュ全体 / UVアイランド の選択方法がある。 (3Dビューで指定すると、裏面のメッシュにも影響が及ぶので注意) クイックマスク キーボードショートカット ※クイックマスクはアンドゥ(Ctrl+Z)は使用できません。 T…クイックマスクの編集と使用の切り替え Y…クイックマスクを解除 I…クイックマスクを反転 その他 パーティクルブラシの "fill" を使うと便利なときもある! (角度を検出して塗り分けが出来る)

Substance Painter Tutorialをやってみる⑩

Image
Substance Painter Tutorial ? Fundamentals 10: Particle brush 要点まとめ パーティクルブラシ SPの目玉機能!として紹介されるパーティクルブラシ! 便利ですが、設定が多くあってちょっとめんどくさいです。 パーティクルブラシの項目 とりあえず、"heavy_leaking"のパーティクルブラシの項目を確認 dt …DistanceTime?パーティクルの間隔を指定してくれるみたいです。 Emitter…エミッターのタイプを設定 SpawnRateFactor …パーティクルの発生量? SpawnSpeed …パーティクルの発生スピード? SpawnSpread …パーティクルの拡散量 Receiver…よくわからない。 DrowOnBumpSensityvity…よくわからない DrowOnGeomSensityvity…よくわからない FadeOpacity FadeOpacityRand…のランダマイズ FadeSize FadeSizeRand…のランダマイズ Friction GlobalWindX…風向き(X方向) GlobalWindY…風向き(Y方向) GlobalWindZ…風向き(Z方向) GravityFactor …重力度 InheritVelocity …法線方向を加味するかどうか。 InheritVelocityRand…上記のランダマイズ NormalFactor …ノーマルマップへの影響度を指定 ParticleLife …パーティクルの生存時間 ParticleLifeRand…パーティクルの生存時間のランダマイズ Spread …パーティクルの飛び散り具合? TurbulencePower …パーティクルの乱れるパワー TurbulenceScale …パーティクルの乱流のサイズ ざっとみて赤文字のところが大切そうなところ。 この項目もブラシと同じで、自分でプリセット化が可能。 必要に応じてライブラリ化してね!みたいなかんじです。

Substance Painter Tutorialをやってみる⑨

Image
Substance Painter Tutorial – Fundamentals 09: Painting and brush settings 要点まとめ ブラシのパラメータについて サイズとジッターについてが主なところ。 回り込みに気をつけるためにBuckfaceCullingの項目に注意すること 間隔のサイズ変更についてはスクリーンベースかオブジェクトベースによって ブラシサイズが変わってしまうので、この点については注意が必要そう。 ブラシのドローイングショートカット 1 ブラシツール 2 消しゴムツール 3 投影ツール Shift + 左 まっすぐ線をひく Ctrl + Shift + 左 スナップを有効にして線を引く Ctrl + 右 (横)ブラシサイズ/(縦)ブラシの硬さ Ctrl + 左 (横)フロー(流入度?)/(縦)ブラシの角度 ステンシルのショートカット S + 右 ステンシルをズーム S + Shift + 左 … ステンシルの回転スナップ S + 左 ステンシルを回転 S + 中央 … カメラを移動 ※ステンシルの不透明度や、ペイント中の非表示設定は、ビューア設定から変更 レジーマウス 上のほうにあるボタンを押すと、滑らかな線が引ける。 シンメトリ 上のほうにあるボタンを押すと、シンメトリで書ける。(x/y/z) 設定のプリセット化 ブラシプロパティの上で右クリックすると以下の三つが出てくる。 Create tool preset Create material preset Create brush preset material/brushは分かりやすいが、toolが読み取りにくい。 見た感じだとおそらく、ブラシとマテリアルの設定を混ぜたものをツールとして呼んでいる気がする。

Substance Painter Tutorialをやってみる⑧

Image
Substance Painter Tutorial – Fundamentals 08: materials and channels 要点まとめ マテリアルとchannelに対する理解 この項目はそんなに大きな内容はすくないかも? TextureSet Settingsの項目で、PBRの基本チャンネル意外の項目増やすことで あれこれできるよ!って話がメイン。 増やしたチャネルについては、マテリアル/ブラシ/レイヤー等のツール全般に及ぶから 注意してね!みたいな話。 ちょっと面白かったのは、AOが直接書き込めること。 差分確認は、ビューワー設定のAO Intensityの項目をいじると分かりやすい。 動画内では、エミッシブも直接書いてたので、これも楽しそう。

Substance Painter Tutorialをやってみる⑦

Image
Substance Painter Tutorial – Fundamentals 07: Working with layers > 要点まとめ レイヤーとブラシについて 大事なところは右のUIのとこ。 基本はPhotoshopとおんなじ。 レイヤー レイヤは一番右のやつ。 ブレンディングモードや、表示のオン/オフといって そんなに難しくない。 TexturesSet Listで分かれてても、コピペでレイヤーを持っていける。 めんどくさいのは、フィルタ関連やスマートマテリアルといった昨今の新規要素関連になりそう。 一つずつ挙動を確かめるかんじで。 既存のビットマップテクスチャを読み込む方法としては、 塗りつぶし(fill)として読み込むようです。 あと塗りつぶしの際のUV投影方法 やっぱり際はおかしくなりやすい。たぶん最適解はそれぞれ違いそう。 UV Projection(UVの切れ目が処理仕切れてない。) TriPlanaer(球面だと何処かがゆがむ) ブラシパレット 初回は、パレットの中の項目が大きく分けて三つある点に注目。 黄:ブラシ 呼んで字のごとく、ブラシパレット。 細かなパラメータはあんまり気にしなくて大丈夫そう。 使う都度覚える感じで。 紫:ステンシル マスキングとかして使う項目。 赤:マテリアル ここが一番ポイント。 TextureSetで作成したテクスチャ要素分:channels(color/metal/rough/height)を 一括で書けるようにスイッチが存在している。 必要な項目にチェックをつけて使おう。