This is a technique to get the Vertex colors from your model baked to a texture using a Mental Ray bakeset.
One method of getting vertex colors from a mesh to a texture is using the Paint Vertex Color tool's 'export' option under 'attribute maps'. This is pretty good for higher poly models, but falls apart on low poly models that might have vertex colors assigned per face rather than per Vert. On these models, the results will look muddy, as there are not enough verts to carry the info.
The other draw back of the Paint Vertex Color tool's export option is that it has no texture padding built in, so whatever colors you get out will be riddled with seams.
I like to use the Mental Ray bake sets to get lighting and color information from Maya to Photoshop. Although it doesn't handle vertex color straight off the shelf, its pretty easy to set it up by making a shader that reads the model's vertex colors.
 |
| On left- Sharp details preserved, padding enabled. On right, fuzzville. |
So, to set it up:
- Make a new material and assign it to your model. I prefer lambert because I'm only after flat color.
- In hypershade, make a MentalRayVertexColors node.
- Click on the MentalRayVertexColors node. Under cpvSets in the attribute editor, click the button that adds a new item.
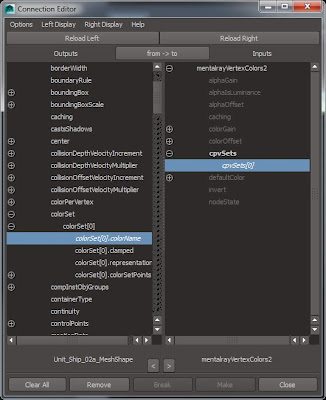
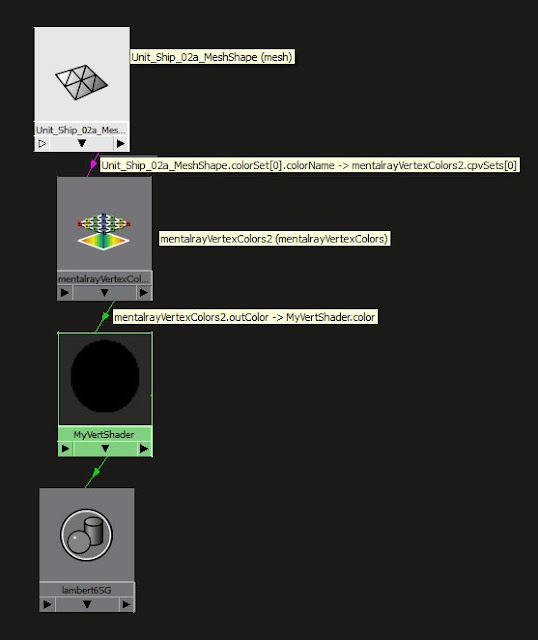
- Back in the HyperShade, bring up the shading graph of your material, and connect the MeshShape output of your object to the mentalrayVertexColorsNode input.
- Find the colorSet->colorSet[0]->colorSet[0].colorName attribute to the cpvSets->cpvSets[0] input.
 |
| That one. Over there. |
- Now, you can use your Mental Ray bake set to bake out your colors by setting it to bake light and color. Did I mention there is padding as well? Well, there is, and its awesome.
- This also lets you render your vertex colors in the Mental Ray Renderer, which is a cool bonus.
 |
| Your final shading node should look something like this. Mind boggling. |


Comments
Post a Comment